Getting Started
Installation
The easiest way to install the latest stable version of Metamapper is using Docker. We currently do not support alternative installation methods.
$ docker pull metamapper/metamapper:latest
Metamapper provides a Docker image via Dockerhub for every release. You should be (and we have been) able to launch this image on any container orchestration platform like ECS, Kubernetes, or Nomad.
Official Boostrap
We maintain a repository for bootstraping an instance of Metamapper. This is the recommend installation method.
Note that the bootstrap requires Docker and Docker Compose to work.
To get started, we recommend you fork the repository and run the following command:
$ ./setup.sh
Once the bootstrap has completed, you should be able to run:
docker-compose up
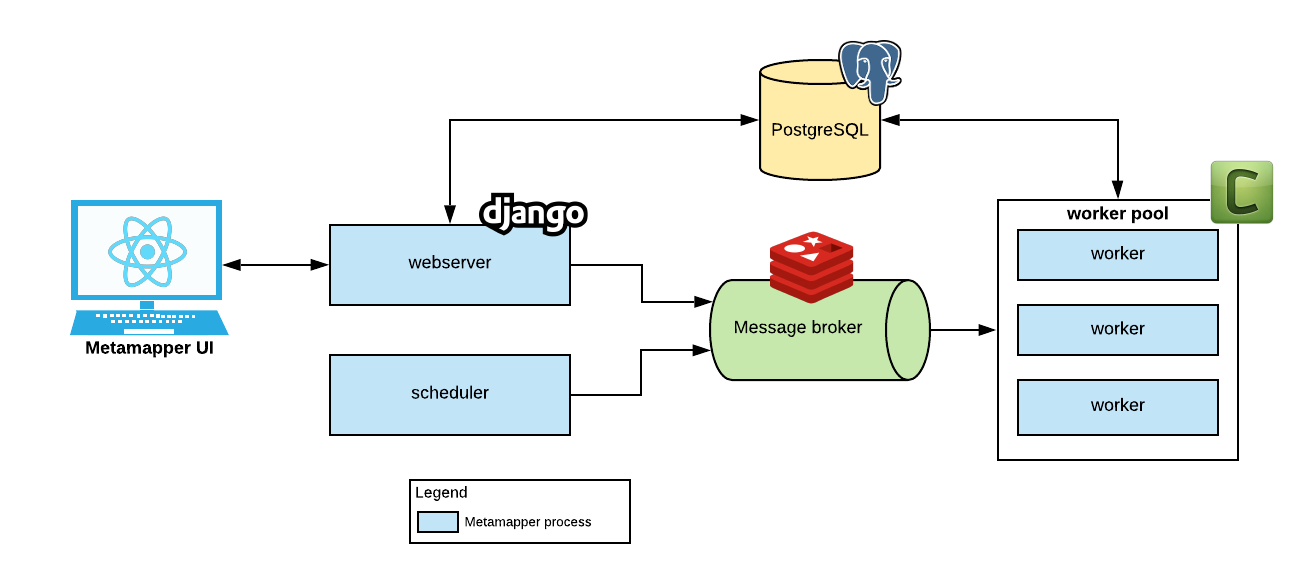
Architecture
On the backend, Metamapper is a Django application that relies on Celery for asynchronous task processing. On the frontend, we use a React application created via create-react-app that gets compiled and served through the Django application.
You can see an overview of the architecture in the diagram below.
Services
Metamapper requires three separate services to operate. Commands to spin up these services are accessible via the docker-entrypoint.
These processes all need to be run as a persistent services in your production environment.
Refer to Configuring Metamapper for details on overriding the default settings for these services.
Webserver
The Metamapper webserver handles HTTP requests via gunicorn. This service is required to access the Metamapper UI, which is accessible at http://localhost:5050 by default.
$ docker run --env-file .env metamapper/metamapper:latest webserver
Metamapper uses GraphQL for the majority of HTTP requests.
Worker
Metamapper uses a queue-based architecture to process certain load-intensive tasks asynchronously.
You can spin up a worker service with the following command:
$ docker run --env-file .env metamapper/metamapper:latest worker
Scheduler
The Metamapper scheduler process periodically triggers tasks for worker nodes to process. To start a scheduler, simply run the command:
$ docker run --env-file .env metamapper/metamapper:latest scheduler
External Dependencies
Metamapper has two primary external dependencies:
- PostgreSQL database (version 9.6 or later)
- Message broker that is compatible with Celery
These dependencies are included in the docker-compose.yml of the bootstrap. However, we strongly encourage you to use managed services, such as Amazon RDS or Google Cloud SQL, when deploying Metamapper to your production environment.
Environment Variables
You might have noticed that we reference a --env-file in the above commands. This is because Metamapper configures the required external dependencies via environment variables.
| Environment variable | Example |
|---|---|
METAMAPPER_CELERY_BROKER_URL | transport://userid:password@hostname:port/name |
METAMAPPER_CELERY_RESULT_BACKEND | db+postgresql://scott:tiger@localhost:5432/mydatabase |
METAMAPPER_DB_NAME | mydatabase |
METAMAPPER_DB_USER | scott |
METAMAPPER_DB_HOST | localhost |
METAMAPPER_DB_PASSWORD | tiger |
METAMAPPER_DB_PORT | 5432 |
These environment variables are set via Docker Compose when using the bootstrap, though you will likely have to update them when deploying to production.